Visual Studio Build Configuration Tip

I’ve received several emails recently from users of my VC Build Hook utility that mention switching the ‘UseVC7Paths’ setting on and off depending on the build configuration they are working on. If you are doing this, you need to change your project structure!

Build configurations in Visual Studio 6 and later are logically attached to the solution, not to an individual project as they were in older Visual Studio versions. What happens is that programmers find it easy to add a new build configuration to an existing ObjectARX wizard created project for targeting a new release of AutoCAD — unfortunately those configurations end up belonging to the entire solution instead of just one project. Since VC Build Hook cannot be set on a per-configuration basis, they end up having to change the project setting depending on which configuration they are building. That’s bad, very bad!

The correct way to handle this situation is to create new projects, not new build configurations. Yes, it’s a bit more work, and it would be nice if Microsoft added an easy way to clone a project, but them’s the breaks. Targeting different AutoCAD releases requires project-level changes, so you must create a new project instead of trying to get by with a new build configuration. You can and should share source code files between the projects, however.

When I create a new multi-target solution that e.g. targets AutoCAD 2000 – AutoCAD 2008, I structure the project files on my hard drive like this:

Solution (.sln file)
ARXProject (ARX module source files)
 +ARXProject.15 (.vcproj file)
 +ARXProject.16 (.vcproj file)
 +ARXProject.17 (.vcproj file)
DBXProject (DBX module source files)
 +DBXProject.15 (.vcproj file)
 +DBXProject.16 (.vcproj file)
 +DBXProject.17 (.vcproj file)

When starting a new project, I first use the wizard to create a default project structure and source code files for the current AutoCAD release. Once I’ve got that set up the way I want (including moving the project file into a subdirectory and modifying the source file paths appropriately, as well as setting the _ACADTARGET preprocessor macro), I clone projects by copying the .vcproj files and editing the copies in a text editor to give them a new GUID, then recreate my solution’s project structure from scratch by dragging and dropping the project files back into the solution and editing them as necessary.

If you need to target multiple AutoCAD releases from a single project, invest the time to set your solution up this way (and follow the other advice on my ARX tips page!), otherwise you will find yourself constantly fighting the system.
DWFx: The Emperor’s New Clothes?

I pointed out in a previous post that while the press release headlines pronounced that Vista will support DWF natively, the fine print says otherwise. What Vista does support natively is Microsoft’s new XPS (XML Paper Specification) format. Autodesk has since clarified that they are working on a new DWF format called DWFx that is, essentially, a DWF in XPS format.

A quick test verified my suspicions that XPS files produced by the Microsoft XPS Document Writer are much larger than comparable DWF files. The jury is still out on DWFx file sizes, but a recent post on Scott Sheppard’s blog (http://dwf.blogs.com:80/beyond_the_paper/2007/02/autocad_2008_dw.html) has buried within it a telling comparison point between DWF and DWFx.

The chart uses a neat gambit by comparing both DWF and DWFx file sizes to the completely different DWG format, but the math cognoscenti among you will notice that “typically 1/20 the size of the DWG” for DWF and “typically 1/10 the size of the DWG” for DWFx translates into “DWFx files are twice as large as DWF”. There is no information on file generation times, another metric worth monitoring.

Autodesk has been pretty generous lately, first giving away Design Review, now perhaps gearing up for an exclusive two-for-the-price-of-one deal on DWFx. I haven’t heard too many customers requesting larger file sizes, though.

Introducing OpenDCL for AutoCAD

AutoLISP programmers may remember a product named ObjectDCL, by 3rd Day Software. ObjectDCL was released as open source in the summer of 2006 by developer Chad Wanless due to his inability to continue supporting the software because of “health reasons”. At the time, many users of ObjectDCL hoped that someone would update the code to work in AutoCAD 2007. Programmer David Robison did some work to get AutoCAD 2007 supported, but the project has been languishing, almost to the point of extinction.

After being asked by several ObjectDCL users whether I could help, I decided a few weeks ago to contribute to the community by getting the original C++ code updated to support AutoCAD 2007. As I am wont to do, I’ve ended up re-architecting much of the code in the process.

The results of my work are available now at the new OpenDCL project on SourceForge. The new 4.0 release is still in the alpha testing phase. If you program in AutoLISP and want to create rich user interfaces for your applications, check it out!

I’ll take web sites for $200, Alex: Part IV

(continued from Part III)

Creating custom modules for DotNetNuke is an esoteric process that I don’t recommend unless you’re prepared to invest quite a bit of time and effort. I slogged through the process because I’m too stubborn to quit, but it’s hardly worth the investment in time for a one-off custom module. I don’t expect many of my readers to try it anyway, so I won’t bother describing the technical aspects in any detail.

My primary objective was to create a Docket History module that renders a court case’s docket history in an HTML table. Since DotNetNuke modules (generally) render data from a database, a large part of my work was defining the database structures and database interface code. The database work was an opportunity to learn more about SQL syntax, something I had never really delved into very deeply in the past. As the module began taking shape, I found myself having to refactor over and over again, often changing the database structure in the process. Changing the database structure meant recreating the data and rewriting the database interface code.

Once I had a working Docket History module, I decided to apply what I had learned to a second custom module for the Grapevine page of the web site. This module would simply display a date-ordered list of links to external web pages, including a column for the “Source” of the linked page — a bit less complicated than my first module. It should come as no surprise that the second one took about a tenth as much time as the first, mainly because I spent much less time refactoring. That doesn’t mean I got it right the first time. In fact, I eventually went back and made yet more changes to the first module to reflect the optimizations and design improvements I discovered while working on the second.

To recap, the web site today consists of DotNetNuke 4.4.0 “out-of-the-box” (I upgraded to 4.4.0 from the original 4.3.7 after 4.4.0 shipped in late December), a free skin from Nina’s Free Skins, the two custom modules I created, and a bug fix to correct a PDF file download issue as described in a DotNetNuke forum thread. Total time spent was around 200 hours over four weeks. Finally, a complete web site — or was it? In Part V, find out what the last missing ingredient was.

I’ll take web sites for $200, Alex: Part III

(continued from Part II)

DotNetNuke (aka DNN) is not simple to set up. It needs at least the free SQL Server Express Edition on the host system (full SQL Server requires some changes to the default configuration) and either IIS or another ASP .NET 2.0 compatible web server to run on. If you have Visual Studio 2005 fully installed, you have all you need to run DNN.

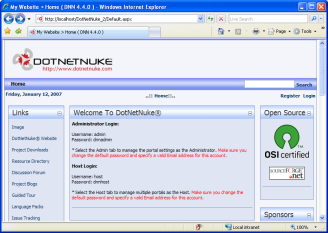
There are a number of manual steps involved, and the steps are different depending on the environment, and whether or not you have the version with full source code included. The quickest route to an operational DNN installation is to download the latest ‘Install’ files from http://www.dotnetnuke.com/ and unzip them to a new folder. Next, make sure the ASPNET account has modify, read, execute, and write access to that folder (new folders will not have this permission by default — it must be added). Next, create a new virtual directory in IIS and map the new virtual directory to the new DNN folder. Once this is done, open a browser and browse to the new virtual directory. This will initiate the DNN installation sequence, where it creates and populates its database with default settings. Once the installation sequence completes, DNN is ready to use, and looks like this:

The structure of DotNetNuke is designed so that a single DNN installation consists of a host (the person controlling the physical computer on which the web site lives) and any number of portals (that may be administered by others). The distinction is important when changing settings because host settings can place limits on portal settings, and portal settings can override host default settings. In my case, I am both host and administrator of the single portal.

A DNN portal is a single web site. A web site consists of web pages (also called “tabs” in DNN lingo), each containing controls that may be added to predefined “panes” on the page. Before you can add new controls to a page, the controls must be defined. You can define controls by importing “modules”. These can be third party modules, or one of the 15 or so standard modules that come with DNN.

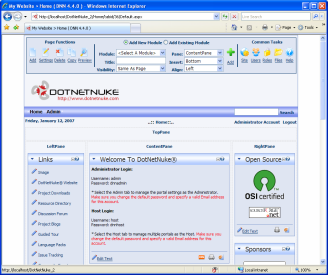
To actually modify the web site, you simply log in to the web site as an administrator. As soon as you are logged in as an administrator, the web pages change to reveal administrative controls that you can use to modify the layout or module settings of the current page, like this:

Notice the control panel at the top of the page, as well as the new hyperlinks on the controls themselves. These can be used to change individual module settings, or to move modules around the page (or even to a different page) very quickly and easily. There is also a new “Admin” menu page that an administrator can use to manage all other aspects of the web site such as the skins, user accounts, security roles, and other site settings. In theory, all this editing can be done on a live web site; in practice, most changes should be made first on a local mirror of the site, then uploaded to the server once they have been fully tested.

The beauty of a CMS system is that the software makes it possible to build a complete multi-page web site in minutes. Changing skins is quick and can change the look and feel of an entire web site instantly. Unfortunately, there’s always a catch. The price of quick-and-easy is that you have to live with the quirks, bugs, and inconsistencies that come with the software. I spent a lot of time trying to fix some little things that I wasn’t happy with. In some cases I was able to fix them myself, but in the end I just had to learn to live with numerous small irritants.

Coming up in Part IV, completing my first custom module.