I’ve updated QuirkyPolyline and added support for Bricscad 14 – 15 and ZWCAD+ 2014 – 2015. The new QuirkyPolyline download is available on the ObjectARX freebies page.
How to fix IntelliSense errors in Visual Studio
New Visual Studio C/C++ users sometimes get tripped up by IntelliSense errors, so today I’ve decided to share the secret, undocumented solution: just turn them off!
IntelliSense is a nice user interface feature when it works, but it has nothing whatever to do with building and running your C/C++ code. IntelliSense errors do not equal compiler errors, and trying to “fix” them is fruitless.
Simply right-click anywhere on the Visual Studio error list (the click must be inside the list, not outside), then uncheck “Show IntelliSense Errors”. Problem solved!
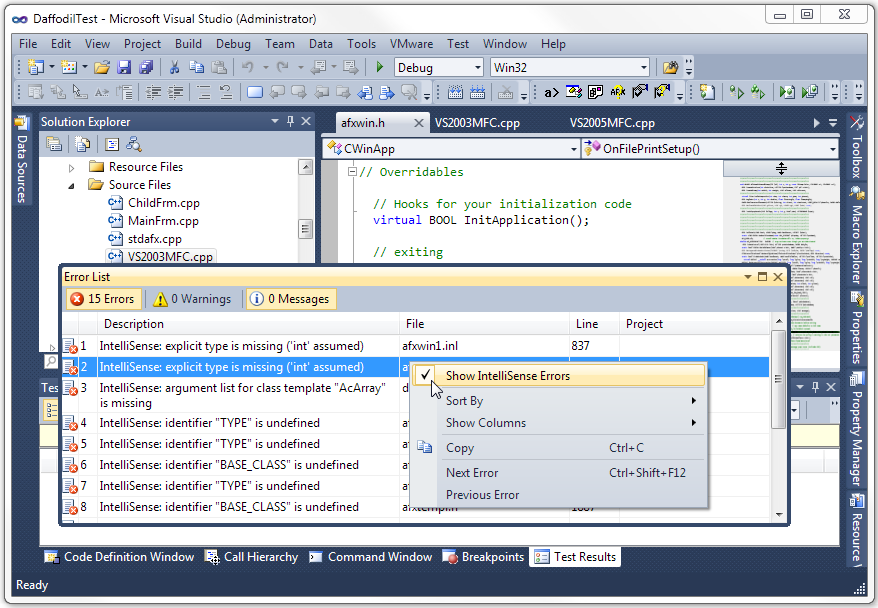
There is one small irritating issue with this solution: your setting is not persisted in the registry, so the errors have to be turned off every time you start Visual Studio.
Writing a Custom Debugger on Windows
Recently I had to debug an intermittent access violation exception in one of my AutoCAD plug-ins. I needed to get the exception while the debugger was attached so I could break the process and analyze the state of memory before AutoCAD’s global exception handler got control. Unfortunately, sometimes it took several hundred runs before the exception occurred.
To make matters worse, AutoCAD was throwing exceptions on shutdown that had nothing to do with my code. If I started AutoCAD manually under the Visual Studio debugger, I had to dismiss those shutdown exceptions manually every time. I needed a way to script the task of starting AutoCAD under the debugger hundreds of times in a row until the exception finally occurred.
After some futile attempts to script the Visual Studio debugger, I decided to just write my own custom debugger. With my own custom debugger, I could easily write code to decide at runtime which exceptions to ignore and which were of interest. The exception I was interested in always occurred while accessing a memory location that ended in 0x30, so my custom debugger ignores access violations that don’t fit the pattern.
I had also planned to see if I could suspend the main thread, detach my custom debugger, and manually attach the Visual Studio debugger when my target exception was triggered so that I could utilize the more advanced VS debugger UI. In the end I never got around to trying the debugger switch because I discovered the problem by simply displaying some relevant details in a simple message box when the target exception occurred.
As you can see, I hardcoded the application path and command line, which includes a script file that simply quit AutoCAD after it started. I then used a batch file to run the custom debugger in a loop, thereby starting and quitting AutoCAD each time through the loop. I made this debugger a console app, but it could just as well be a window app.
I don’t claim to know anything about writing debuggers; this is just something I cobbled together after doing a bit of searching on the web. I decided to share the code in case someone else runs into a similar debugging scenario.
int _tmain(int argc, _TCHAR* argv[])

{

STARTUPINFO si;

ZeroMemory( &si, sizeof(si) );

si.cb = sizeof(si);

PROCESS_INFORMATION pi;

ZeroMemory( &pi, sizeof(pi) );

static TCHAR szCmdLine[] = _T(" /nologo /b C:\Test\quit.scr");

CreateProcess ( _T("C:\Program Files\Autodesk\AutoCAD 2014\acad.exe"), szCmdLine, NULL, NULL, FALSE, DEBUG_ONLY_THIS_PROCESS, NULL,NULL, &si, &pi );


DWORD dwContinueStatus = DBG_CONTINUE;

DEBUG_EVENT debug_event = {0};

bool bFirstBreakpoint = false;

bool bContinueDebugging = true;

while( bContinueDebugging )

{

if( !WaitForDebugEvent( &debug_event, INFINITE ) )

return 0;

//process event

switch( debug_event.dwDebugEventCode )

{

case EXIT_PROCESS_DEBUG_EVENT :

{

bContinueDebugging = false;

}

break;


case EXCEPTION_DEBUG_EVENT:

{

dwContinueStatus = DBG_EXCEPTION_NOT_HANDLED;

EXCEPTION_DEBUG_INFO& exception = debug_event.u.Exception;

switch( exception.ExceptionRecord.ExceptionCode )

{

case STATUS_BREAKPOINT:

{

if( !bFirstBreakpoint )

{

bFirstBreakpoint = true;

break;

}

dwContinueStatus = DBG_EXCEPTION_HANDLED;

DebugActiveProcessStop(pi.dwProcessId);

bContinueDebugging = false;

MessageBox(NULL,_T("Debug break!"), _T("Breakpoint"), MB_OK);

}

break;


case STATUS_ACCESS_VIOLATION:

if( exception.dwFirstChance == 1 )

{

if( ((DWORD_PTR)exception.ExceptionRecord.ExceptionAddress & 0xFF) == 0x30 )

{

DebugActiveProcessStop(pi.dwProcessId);

DWORD64 Rip = (DWORD64)-1;

HANDLE hThread = OpenThread( THREAD_ALL_ACCESS, FALSE, debug_event.dwThreadId );

CONTEXT Context;

Context.ContextFlags = CONTEXT_ALL;

if( GetThreadContext(hThread, &Context) )

Rip = Context.Rip;

MEMORY_BASIC_INFORMATION mbi = { 0 };

VirtualQueryEx( pi.hProcess, exception.ExceptionRecord.ExceptionAddress, &mbi, 0x36 );

TCHAR szMsg[4096];

_stprintf_s( szMsg, _T("Access violation (%016p) at address %016prnMem State:rnBaseAddress=%016prnAllocationBase=%016prnAllocationProtect=%08xrnRegionSize=%08xrnState=%08xrnProtect=%08xrnType=%08x"), exception.ExceptionRecord.ExceptionCode, exception.ExceptionRecord.ExceptionAddress, mbi.BaseAddress, mbi.AllocationBase, mbi.AllocationProtect, mbi.RegionSize, mbi.State, mbi.Protect, mbi.Type );

MessageBox( NULL, szMsg, _T("Exception"), MB_OK );


}

bContinueDebugging = false;

}

break;


default:

break;

}

}

break;

}

ContinueDebugEvent( debug_event.dwProcessId, debug_event.dwThreadId, dwContinueStatus );

}


return 0;

}
AutoCAD 2015: Managing the Application Manager
AutoCAD 2015 includes a new feature called Application Manager. I’m sure it serves a lofty purpose, but it comes across a lot like the slimy Norton and Adobe updaters that are really just Trojans in disguise. It gets installed by default, with no option to prevent installation. To Autodesk’s credit, they do provide instructions for preventing installation of Application Manager, and instructions for removing it after the fact. Uninstalling requires several additional clicks, as if they really, really want you to think twice before taking such a drastic measure.
I don’t want anything starting when I log into Windows except the bare minimum, so I uninstalled Application Manager forthwith. It can be installed and started manually if I decide to use it later.

If you decide to use Application Manager, there are some configurable settings. There is even a UI for most of the settings (such as disabling the automatic startup), but there’s a catch: to use the UI for changing settings, you first have to agree to the Autodesk Privacy Statement (and give Autodesk access to information about your installed software). I’m sure this is just an oversight, but the paranoid will not find it comforting.
Application Manager settings are stored in a plain text file, located by default at:
“%AppData%AutodeskAutodesk Application Manager.ini”
If you don’t want to agree to Autodesk’s terms, you can still change settings by editing the .ini file in a text editor like Notepad (just enter the file path above in Start -> Run). For example, change the line to AutoRun=false if you want to disable “Automatically start when you log into the computer”. Note that this setting is somewhat misleading: Application Manager always starts regardless, but it quickly exits again if AutoRun is set to false. If you already agreed to the privacy policy, but have since changed your mind, you can set PrivacyPolicyLevel=0.
Building a commercial grade lisp plugin installer in 5 easy steps
Rumors about the death of AutoLISP have been floating around for many years, but fear not, those rumors are greatly exaggerated. Bricscad and ZWCAD both have excellent support for lisp plugins, so well-written lisp code is truly cross-platform and enjoys a large and growing audience. Unlike other languages, the vast majority of lisp code works unmodified on any hardware architecture, in any version of Windows, and inside any host application that supports it, including AutoCAD versions released more than a decade ago. On top of that, OpenDCL gives lisp developers the power of a modern event-driven user interface that can put their lisp plugins on the same playing field as plugins written in any other language. This is a powerful combination, and given lisp’s low entry cost, it is not surprising to see lisp continuing to enjoy strong support in the developer community.
There’s just one thing missing: an easy way to install a lisp plugin on an end user’s computer. It’s a common refrain. How do you build a setup program for a lisp plugin? There are any number of free and low-cost installers available, but they are all designed for installing an executable program, not a plugin that must be configured to run inside a completely independent host application.
At one time there was a package called AcadInstall that was designed for AutoCAD add-ons, but that tool is long defunct. Autodesk has invented application bundles with the supposed benefit of making it easier to install and manage plugins, but these are not well documented and only work with recent versions of AutoCAD. For ManuSoft plugins, I use Visual Studio’s Setup and Deployment projects along with an extensive amount of custom C++ code to perform all the configuration necessary at install time. This works great for my needs, but it is well beyond the ability of most lisp developers.
After several recent online discussions with lisp developers struggling to get a working setup program, I set out to find a solution to this vexing problem. It turns out that after some initial work it’s actually not that hard to pull off a very professional looking setup program for a basic lisp plugin. In fact, if you follow these steps, in less than 10 minutes (5 minutes if you have a fast internet connection) you will have a working setup that installs a lisp plugin on any version of AutoCAD, Bricscad, or ZWCAD+. The best part: everything you need is free (as in beer)!
So, let’s get to it.
- Download and install Unicode Inno Setup QuickStart Pack from the Inno Setup Downloads page.
- Download my LispPluginSetup freebie and extract the files into a new folder somewhere.
- Download my LspLoad freebie and extract the files into a new subfolder named LspLoad.
- Double click on MyLispPlugin.iss. It should open in Inno Script Studio. Choose Project -> Compile.
At this point you should have a new Output subfolder with MyLispPluginSetup.exe inside. Go ahead, run it. After you’ve installed the MyPlugin sample, start the host application of your choice (the setup program configures all of them). If all went well, MyLispPlugin should display a command line message at startup alerting you to the fact that MYCOMMAND1 and MYCOMMAND2 are now available for use. Go ahead, try them. When you’re finished playing, it should uninstall cleanly (except for the new addition to TRUSTEDPATHS in AutoCAD 2014) when you choose Start -> MyCompany -> MyLispPlugin -> Uninstall My Lisp Plugin.
That was almost too easy, right? Well, not so fast. You’ll need to make some changes to adapt the sample for your own plugin. Take a look at the installation script in Inno Script Studio. Click on the Inno Setup Script item in the project tree to see the entire script as a flat file. Right near the top of the script, it should be obvious that you’ll need to change the basic plugin information preprocessor constants to adapt the script for your own plugin. Obviously your plugin will have a different base filename, and quite probably more files. It may have more registry keys and other basic setup stuff. In addition, you may not want to support all possible versions and flavors of each host app (in that case you’ll need to comment out or remove the associated item in the Files section). You get the idea, I’m sure.
Step 5 is modifying the sample script to adapt it for your own plugin. So easy, even an engineer could do it!