Simplifying the problem: divide and conquer

When a customer reports a drawing-specific issue, the next stage in simplifying the problem is to eliminate all drawing content that has no bearing on the problem. Unless the drawing object that causes the problem is obvious and can be immediately ascertained, I use the divide-and-conquer method to zero in on the cause.

To divide and conquer an AutoCAD drawing, I start by getting a quick feel for what is in the drawing and how it is structured (I use Periscope for this; in fact I originally wrote Periscope for this purpose). The general approach I use is to eliminate roughly one half of the drawing at a time by erasing an arbitrary half, then checking to see whether the problem still exists in the remaining half. Doing this reliably requires some care.

If the drawing has layouts, I start by erasing all layouts except model space. I then save the new file with a new filename, close AutoCAD, restart, open the last file, and test to see whether the problem still exists. If the problem went away, I go back to the original file and start over, erasing everything in model space, then repeat the saveas/close/reopen sequence. Once I pin the problem down to a specific layout (or layouts), I start working on individual drawing entities.

A typical iteration consists of erasing roughly half the drawing entities, then checking whether the problem persists. If the problem goes away, back up and erase the other half, otherwise continue. Entities can be erased either by selection or using QSELECT. If the drawing consists of entities nested inside blocks, I first try erasing the block references; if the problem goes away, I back up and use BEDIT to erase part of the block content.

While going through these iterations, I sprinkle in a periodic purge (using SuperPurge, of course) to remove hidden and invisible objects that become unreferenced as visible entities are erased. I continue this process until I have a drawing file cleaned of everything except the bare minimum needed to reproduce the problem. Often, but not always, that means a drawing file with a single visible entity in it.

The key to success is being methodical and saving with incremented filenames so that it’s easy to back up a step and start over when the problem disappears. Closing and restarting AutoCAD between each iteration helps ensure that the test is not influenced by erased objects remaining in memory. With experience and a bit of skill in correctly guessing where to look, I’ve learned that almost all drawing-specific problems can be narrowed down to the bare minimum in 5 to 10 iterations.
Simplifying the problem: is it the drawing?

One type of support request that I occasionally receive from CADVault users goes something like “when I create a vault, AutoCAD crashes”. I’ve learned that problems like this are usually drawing-specific, so before going any further in simplifying the problem I ask the customer to check whether the problem occurs in an empty drawing. But there’s a trick to this.

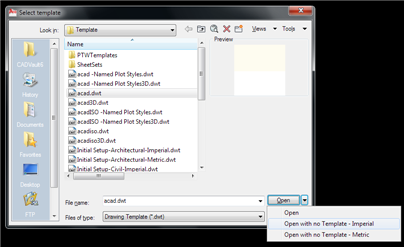
The problem is that “empty drawing” is too nebulous. No drawing is completely empty, and in any case, even drawings with no visible geometry can be far from empty. What I really want to test is whether the problem occurs with a drawing that is as nearly empty as possible. To achieve that, I ask the customer to perform the test on “a new drawing created from scratch, with no template”.

New file with no template

The extra “no template” instruction is necessary because just creating a new drawing will bring in any flotsam and jetsam saved in the default template drawing, which could affect the results.

[Side note: it is my experience that many template drawings contain a lot of invisible junk that does nothing but slow things down. If you’re curious about your own templates, open them and use my shareware SuperPurge tool to see what all they contain. You may be surprised.]

If the steps for reproducing the problem are such that they require some visible geometry, I ask the customer to draw a unit circle at the origin in a new “no template” drawing.

If the problem still occurs in a minimal drawing, then it is not drawing-specific; otherwise the next step is to divide and conquer the drawing to narrow things down further.

The art of simplifying the problem

One of the most important skills in resolving technical problems is not problem solving, but problem definition. Stripping a problem down to its essence often makes the solution obvious. I think this is generally true, but especially true in my experience with software tech support and tracking down software bugs.

The first stage in problem simplification is to document a set of steps that consistently reproduces the problem. These steps must be detailed enough so that someone else can use them to reproduce the problem, including a description of exactly what the problem is. Often this is the most difficult step, either because the problem doesn’t happen consistently, or because the problem description lacks detail.

The second stage is to try eliminating unnecessary steps with the goal of determining the bare minimum steps needed to reproduce the problem. If the problem is drawing-specific, this stage includes stripping everything out of the drawing except the bare minimum needed. This is often very time consuming, but almost always a worthwhile investment because it can eliminate a lot of potential dead ends in tracking down the ultimate cause. Often, this stage requires some trial and error.

The third stage is determining the exact cause and source of the problem. In my experience, even problems that at first appear very complicated can almost always be boiled down to just a few steps with a minimal amount of data.

Finally, in stage four the problem has to be solved, of course!

In future posts, I’ll share some tips and techniques that I use to simplify software problems.

Missing Menu Madness

One of my many complaints about about the CUI system introduced in AutoCAD 2006 is that it’s not very friendly to third party developers. In my opinion, it’s not very friendly to end users either, but I digress…

One example of the unfriendly CUI is the case where a third party application installs a partial menu. In the pre-CUI days, adding a partial menu was an easy way to add an application specific menu to AutoCAD without making any changes to the end user’s existing menu files. If the application was later uninstalled, the uninstall script could remove its menu and clean up the registry, leaving no trace behind. CUI breaks that scenario.

When a partial menu is loaded into AutoCAD 2006 and later, the CUI system actually writes a reference to the new partial menu into the main .cui file. To make matters worse, there is no clean way to programmatically remove those references because there is no deterministic way to locate all the .cui files used by a specific instance of AutoCAD from an uninstall script running outside of AutoCAD.

This would not be the end of the world if AutoCAD simply ignored references to missing files, but it doesn’t. When the CUI command starts, it detects the missing files and displays an obnoxious message box that must be dismissed before the command will continue.
Unable to open file 'c:\program \files\manusoft\superpurge\spurge2004.cui'

Then to top it off, AutoCAD displays a second message box that also must be dismissed.
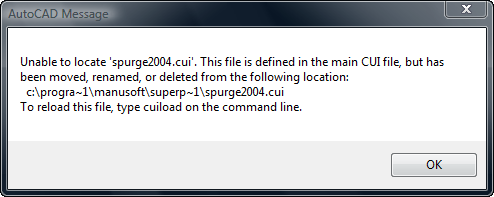
Unable to locate 'spurge2004.cui'. This file is defined in the main CUI file, but has been moved, renamed, or deleted from the following location: c:\program files\manusoft\superpurge\spurge2004.cui To reload this file, type cuiload on the command line.

I think it should be obvious even to an untrained UI designer how ridiculous this is.

In AutoCAD 2006 and 2007, the solution is to dutifully dismiss both dialogs, then when the CUI dialog finally appears, click [Apply] to rewrite the .cui file without the missing partial menu references. In AutoCAD 2008 and 2009, you have to first expand the ‘Partial CUI Files’ node in the Customization tab, then right-click on the unresolved partial menu file and select ‘Unload CUI File’, then click [Apply].