I’ll take web sites for $200, Alex: Part III

(continued from Part II)

DotNetNuke (aka DNN) is not simple to set up. It needs at least the free SQL Server Express Edition on the host system (full SQL Server requires some changes to the default configuration) and either IIS or another ASP .NET 2.0 compatible web server to run on. If you have Visual Studio 2005 fully installed, you have all you need to run DNN.

There are a number of manual steps involved, and the steps are different depending on the environment, and whether or not you have the version with full source code included. The quickest route to an operational DNN installation is to download the latest ‘Install’ files from http://www.dotnetnuke.com/ and unzip them to a new folder. Next, make sure the ASPNET account has modify, read, execute, and write access to that folder (new folders will not have this permission by default — it must be added). Next, create a new virtual directory in IIS and map the new virtual directory to the new DNN folder. Once this is done, open a browser and browse to the new virtual directory. This will initiate the DNN installation sequence, where it creates and populates its database with default settings. Once the installation sequence completes, DNN is ready to use, and looks like this:
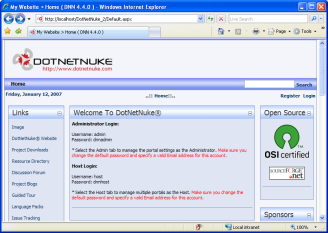
The structure of DotNetNuke is designed so that a single DNN installation consists of a host (the person controlling the physical computer on which the web site lives) and any number of portals (that may be administered by others). The distinction is important when changing settings because host settings can place limits on portal settings, and portal settings can override host default settings. In my case, I am both host and administrator of the single portal.

A DNN portal is a single web site. A web site consists of web pages (also called “tabs” in DNN lingo), each containing controls that may be added to predefined “panes” on the page. Before you can add new controls to a page, the controls must be defined. You can define controls by importing “modules”. These can be third party modules, or one of the 15 or so standard modules that come with DNN.

To actually modify the web site, you simply log in to the web site as an administrator. As soon as you are logged in as an administrator, the web pages change to reveal administrative controls that you can use to modify the layout or module settings of the current page, like this:
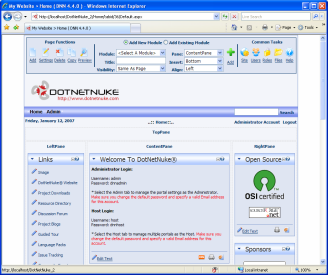
Notice the control panel at the top of the page, as well as the new hyperlinks on the controls themselves. These can be used to change individual module settings, or to move modules around the page (or even to a different page) very quickly and easily. There is also a new “Admin” menu page that an administrator can use to manage all other aspects of the web site such as the skins, user accounts, security roles, and other site settings. In theory, all this editing can be done on a live web site; in practice, most changes should be made first on a local mirror of the site, then uploaded to the server once they have been fully tested.

The beauty of a CMS system is that the software makes it possible to build a complete multi-page web site in minutes. Changing skins is quick and can change the look and feel of an entire web site instantly. Unfortunately, there’s always a catch. The price of quick-and-easy is that you have to live with the quirks, bugs, and inconsistencies that come with the software. I spent a lot of time trying to fix some little things that I wasn’t happy with. In some cases I was able to fix them myself, but in the end I just had to learn to live with numerous small irritants.

Coming up in Part IV, completing my first custom module.

I’ll take web sites for $200, Alex: Part II

(continued from Part I)

The kind of web site I wanted to create is usually built on top of a Content Management System (CMS) that becomes the administrative user interface as well as the framework for web pages that get served to web site visitors. The first thing I learned is that there are *thousands* of CMS products floating about the internet, from simple “guest book” type scripts to full blown corporate extranet management systems designed for use by tens of thousands of employees and customers. I’ve also been looking for an excuse to learn ASP.NET, so I decided to narrow my search to CMS software that was based on ASP.NET. Finally, the software had to be free or very inexpensive.

Based on these criteria, I narrowed the choices down to Community Server [now Telligent Community], DotNetNuke, Rainbow Portal, and newcomer FlexCMS. Community Server is free for personal use, but for my planned use it would have cost several hundred dollars — probably out of my range, but I still downloaded and tested it for comparison purposes. DotNetNuke is open source based on a permissive BSD-style license (free to use or modify for any purpose), plus it has a large and relatively mature user base. Rainbow Portal is released under the LPGL license, with discussions currently underway about changing the license. Both DotNetNuke and Rainbow Portal are based on a Microsoft sponsored sample ASP application called IBuySpy. Rainbow Portal seemed more polished, but I ran into some limitations with both pretty quickly. FlexCMS, while seemingly more logically designed and built from the ground up on the latest version of ASP.NET, was clearly lacking a lot of features that the other two free packages included. In the end I chose DotNetNuke because it had a more permissive license and a larger user base to draw support from (I found the documentation for all these packages fairly useless, so peer support was a must).

Next step was finding an inexpensive web host that would enable me to install, run, and administer an ASP.NET/SQL Server application. If you’ve ever looked for a web host, you’ll know that it’s sometimes difficult to find one that provides the remote management capabilities and server software that you need (in my case ASP.NET and SQL Server running on IIS, which are less common than PHP/MySQL solutions running on Linux). I’m aware of several quality hosting companies. Pair networks usually gets good reviews, but they don’t do Windows. I’ve used GoDaddy before for registering domain names without any problems, so I headed there to check out their prices and policies for hosting plans. When I saw that they offered a Windows based economy plan with plenty of storage space and bandwidth for $3.19 per month, I decided to just register my new domain name and sign up for GoDaddy’s shared hosting plan on the spot, and be done with it.

Total cost for DotNetNuke CMS software, 2 years of web hosting, and a new domain name registered for two years: $88. Not bad. In Part III I’ll show you how DotNetNuke works.

I’ll take web sites for $200, Alex: Part I

I’m one of those throwbacks that learned HTML by typing it in Notepad. I’ve since moved up to using the Visual Studio editor; it does syntax coloring, error highlighting, and has a “design” mode for previewing the page, yet it’s a very utilitarian editor that I feel comfortable with. I do use FrontPage when I need to manage connections between multiple HTML pages, but mostly in raw HTML mode. When I use WYSIWYG design mode in FrontPage, I inevitably end up cleaning out a lot of unnecessary junk that it includes in the generated HTML. I think it’s fair to say that my obsession with clean HTML results in utilitarian, functional, and standards conformant presentations — but with a decided lack of graphic appeal.

The ManuSoft and CADLock web sites are examples of this utilitarian approach. The ManuSoft site uses no fancy graphics and relies very little on client side scripting, and it supports a hierarchical navigation system using only standard hyperlinks. I like that minimalist approach, but the price for clean HTML being served to clients is a lot of work on the server to maintain the site. As a result, I don’t update the site very often because it’s just too difficult.

This blog was the first step toward realizing a goal of making it easier to add new content. After all, the raison d’être of blogs is to minimize the latency between the writer’s stream of consciousness and words on the web by making it irresistibly easy to add new content. This is precisely why blogs have become so popular.

Unfortunately, I soon found limitations with my blog. Tabular lists of data still require manual HTML input, it is difficult to customize the content area outside the individual posts on the blog page, and most aspects of the hosted blog software are outside my control. I wanted more.

The Autodesk vs. Open Design Alliance lawsuit gave me an excuse to take the next step: implement the “blog” concept across an entire web site with software that I control. So, I decided to swallow my pride and learn how to create an entire web site that would be so easy to update that I would actually update it frequently — even if it meant messy HTML code. Stay tuned for Part II, choosing a hosting service and deciding which software to use.

Coming up for air

While the rest of you were busy enjoying the holiday break, I’ve had my nose to the grindstone. I had been looking for an opportunity to learn more about ASP.NET and web site content management, and the Autodesk vs. ODA web site that I started recently was a perfect opportunity. After 3 weeks of sometimes frustrating adventures, the new site is now live (although still not quite finished).

Total cost of the site, including hosting for 2 years? About $200 and a lot of lost sleep. Over the next week or so I will be documenting some of the things I learned along the way.